Translate

Friday, March 29, 2013

Stampin' for the Weekend Challenge #7

Hi to all and a wish for a wonderful weekend ahead of you!

We have a new challenge over at Stampin' for the Weekend, and boy is it truly a challenge LOL!  At least for me it was.  The theme this fortnight is anything but a card.  I am way too comfortable in my little card world.  Our sponsor is Flat Friends, who have some absolutely adorable digi stamps.  I chose an Easter digi so that I could make my oldest daughter a basket of sorts.

Image side:

I made this square basket by cutting out four panels of Arabian Night Rectangle Frame by Cheery Lynn, these were sponged with Broken China distress ink.  I reinforced each panel with a backing of plain card stock, and the corners with just the middle section of the Victorian Picket Fence die that were sponged in Tea Dye distress ink.  I glued them all onto a cardstock base that was sponged with Peeled Paint distress ink.  I added two strips of Anastasia Border that were cut out in the gold foil paper from DCWV's Royal Garden pack and glued together to form the handle.

The image was colored with Copics, and the edge of the image panel was swiped in Tea Dye distress ink.  I think something is wrong with my Liquid Pearls- it's awfully gloopy and did not form the domed pearl shape that my other bottle does.  I'll have to see if I can scrape them off without ruining the picture and add regular pearls.

Easter Basket side:


The basket and bunny were cut from Cheery Lynn's Spring Basket 1.  The basket was sponged in Tea Dye distress ink while the bunny was sponged in Vintage Photo distress ink.  The liner behind the basket I made by tracing the basket and cutting it out, then sponged with Vintage Photo distress ink.  The eggs are Lace egss #5 and #7, also from Cheery Lynn, which were cut out in the same gold foil paper and placed over a trimmed up Oval Stackers which were cut out on shimmery cardstock.  The butterfly resting on the handle was cut from the Mini Dimensional Butterflies set.

Egg arrangement side:


Same detailsnas the previous side, only added a flower from Cheery Lynn's Daisy Strip and a set of Olive Branches.

And lastly, an egg and flower side:


Here is another flower made from the same Daisy Strip as above, with the edges sponged in Tea Dye distress ink, and left flat instead of the center curled in.  The flourish is Mini Fanciful Flourish, sponged in Peeled Paint distress ink.  The large butterfly is from Spellbinders Grand Wonderful Wings.

I hope you have enjoyed my first venture outside of card making.  I had fun with it and think I will try some other, more elaborate, paper crafting down the line.

I hope to be back before Sunday, but if not I want to wish you all a blessed Easter, with much time spent with your wonderful families!

Copics used:  0, C1, E000/00/11/29/35/39/40/53/55/57, R24/27/29, RV000/00/02

Challenges:
Simon Says Stamp - Anything goes (x5, 4/3/13) entry #2 

Thursday, March 28, 2013

Fun with blending

Hi all,. 
Just popping in quickly to share a fast and fun Easter card I made earlier this week (but forgot to post) for my brother-in-law and his beautiful family.


The image is called Easter Bunny from The Paper Shelter, ribbon is from Really Reasonable Ribbon and the DP is by The Paper Studio.  Such a fun image to practice blending on.  There really is no light source, I kept thinking of how our dyed eggs are always darker in the middle and lighter at the ends, so colored the image to resemble them.  I had a dropped orange Copic blooper, so there's two orange bloops in the bottom part of the egg.  Although I would have happily colored another, I'm almost out of Xpress It, so better wait for my order to get here.

Thanks so much for stopping by to visit.  I hope you have a great rest of the week!!

Details:
Size:  5 x 7
Paper:  basic cardstock, Xpress It, The Paper Studio
Ribbon:  Shimmer satin aqua from Really Reasonable Ribbon
Dies:  Spellbinders Grand Ovals

Copics:  0, 100, B000/00/02, BG000/01/02/10/11/13, BV00/01/02, R20/21/22/24, RV10/11/13, V12/15/17, Y21/23/26, YR01/02/04

Saturday, March 23, 2013

613 Avenue Create challenge

Hello everyone out there in Bloggerland!


Today is the start of a new challenge over at 613 Avenue Create, and it's the easiest, peasiest one of the all- ANYTHING GOES!  For this challenge, we are being sponsored by the fabulous Rick St. Dennis.  Since it's such an easy one, I am hoping everyone will join in the fun!

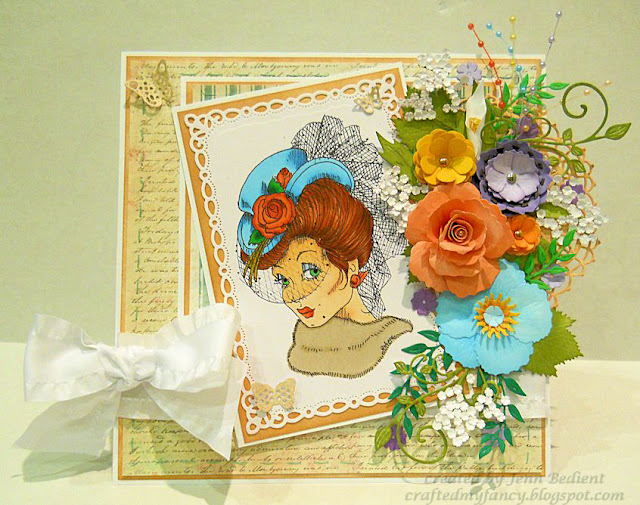
How many are wishing for Spring already?  I know I will raise both my hands to answer that one!  For me, when I think of Spring, I think of flowers, butterflies, birds singing, colors and all the beauty those things carry.  It also symbolizes new beginnings.  I have tried to capture all those in this card, including new beginnings by using as many new items as I possibly could (digi stamp, Copics, flower dies, paper).  I hope I have succeeded in conveying my inspiration, and have inspired you in some way as well!


The beautiful image I chose is called 1935 hat from Rick St. Dennis.  Lots and lots of layers to this card, and boy is it heavy.  All the gorgeous flower, foliage and butterfly dies are from Cheery Lynn (all links at the bottom of the post).  The beautiful ribbon is from Really Reasonable Ribbon.  Papers are from My Mind's Eye Lost and Found.  All background panels were stitched using my Sew Easy tool.  They are mounted on white cardstock that was sponged with Tea Dye distress ink, then mounted again on plain white cardstock. 

Here is a close up of the image:


A shot of the flower arrangement:


All pieces were cut out of white cardstock and colored with either Copics, or in the case of some of the foliage, sponged with Peeled Paint distress ink.  

Build a Flower #2:
- Pink Rose
- Blue flower

Embellishments #2:
- Yellow and orange sunbursts in center of blue flower
Baby's breath

Build a Flower #3:
- Calla Lily

Embellishments #3:
- Center of Calla Lily
- Scattered small purple flowers
- Small blue flower in the center of the big blue flower
- Dark purple embellishments on the big purple flower

The purple flower was put together with two layers of each size of the Cherry Blossom die.  The small orange rose is from the Miniature Rose Strip die, while the bigger yellow rose is from the Large Rose Strip die.  There's two Mini-Fanciful Flourishes, a couple sets of Olive Branches and the rest of the leaves are from the Build a Flower #2 and #3, as well as their accompanying Embellishments sets.  Lastly, there is a Nautical Wheeler Doily die nested behind all those beautiful flowers, and pearl sprays that were colored with the same colors as the flowers.  Whew.  Long paragraph.  Can you tell I love my Cheery Lynn flowers?  lol.  Wake up!  Time for more pictures :)

A close up of the flowers (how I wish you could see these in person!):


A side view, trying to show at least some of the fabulous dimension of these flowers!


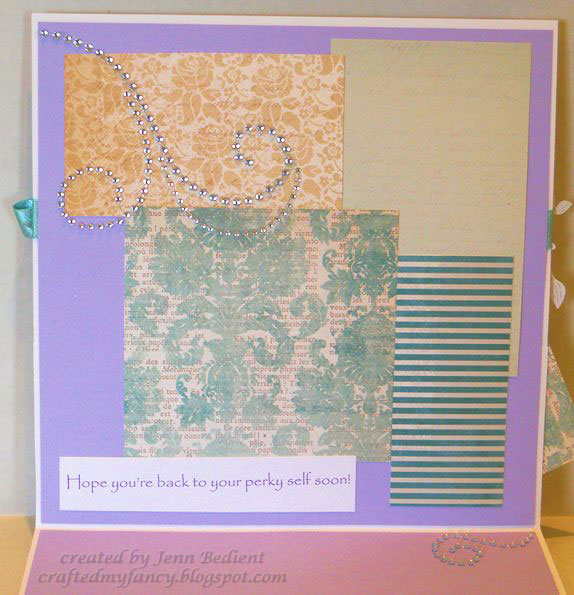
I've also decorated the inside of the card to match the outside.  Here is a picture of the top portion:


 The bird cage was made with Cheery Lynn's Bird Cage die, there's another Mini Fanciful Flourish and a cheese cloth flower cut from circle stackers.  The bird was cut out using Spellbinders Large Rectangles.

And last picture, the bottom portion of the inside:


I very much hope you have enjoyed my card today.  Can't wait to see you over at 613!  Have a great Sunday!!!

Challenges:
Cheery Lynn - (x1, 3/24/13)
The Paper Shelter - Spring (x3, 3/26/13) entry #1
Crafty Blogger Network - Spring or Pastel (x3, 3/31/13) entry #1
Bearly Mine - Anything goes (x2, 3/25/13) entry #2
Crafty Sentiments - Flowers Galore (x3, 3/25/13) entry #1
Simon Says Stamp - Easter/Spring (x5, 3/27/13) entry #1
Craft Your Passion #154 - Ribbons or lace (x3, 3/25/13) entry #1
Ribbon Carousel - Spring is in the air (3/31/13)
Sweet Pea Stampers - Spring colors (x3, 4/2/13) entry #1
Through the Craftroom Door - Anything goes (x2, 3/25/13) entry #1
Bunny Zoe's Crafts - Make it girly (4/6/13)
One Crazy Stamper - Anything goes (x5, 3/29/13) entry #3
ABC Challenge - 'J' for just as you like it (x1, 3/29/13)
Sweet Stampin - Lots of layers (x2, 3/29/13) entry #1
2 Sisters - Easter/Spring (unlimited, 3/29/13)
Brown Sugar - Anything goes (x2, 3/28/13) entry #1
Inky Impressions - Flowers (unlimited, 3/26/13)
Challenges 4 Everybody - (x3, 3/29/13) entry #1

Details:
Size:  8 x 8
Paper:  Basic cardstock, Xpress It, My Mind's Eye Lost and Found
Image:  1935 Hat by Rick St. Dennis
Ink:  Tea Dye and Peeled Paint distress ink
Dies:  Spellbinders Romantic Rectangles and Large Rectangles
Cheery Lynn Dies:  Miniature and Large Rose Strips, Olive Branches, Build a Flower #2, Embellishments #2, Build a Flower #3, Embellishments #3, Cherry Blossom, Mini Dimensional Butterflies, Mini Fanciful Flourish, Bird CageCircle Stackers

Copics:  0, B000/00/02, BV00/01, E000/00/11/08/09/18/19/40/43, G14/16/17, R20/21/24, RV000/02, Y000/02/21/26/28, YR01/02, V99

Friday, March 22, 2013

Wags n' Whiskers Challenge 100

Hello to one and all!

I hope everyone is doing wonderfully well on this Friday morning! One last day before the weekend.  That always puts a smile on my face.


I've been working away on my DT cards, and have been having so much fun now that I have direction to go in and inspiration galore.  I am thrilled to be posting my first post with Wags 'n Whiskers, although I'm a little behind schedule- sorry!   The theme for this challenge is Friendship, so I have made the invitations for my daughter's dress up party.  This image, Furry Friends, was just perfect for that!


The image was colored with Copics.  I added clouds to the background after watching the tutorial on YouTube from Alyce at Kit and Clowder.  I used the dot technique for the ground, then overlayed it with three strips of grass from Cheery Lynn.  The flowers were made with Cheery Lynn's Miniature and Large Rose Strip dies, and the leaves are from Cheery Lynn's Olive Branches die, finished off with some tulle tucked behind the large rose on the top and bottom.  The butterfly is from Spellbinders Wonderful Wings Grand dies, cut out on the gold foil paper from DCWV's Royal Garden stack.  The rectangles behind the image and the sentiment were cut out using Spellbinders A2 Matting Basics, set A.  The sentiment I just printed from my computer and sponged the panel with Victorian Velvet distress ink.  An easy card!

Close ups:


Hope to see your creations in the Wags 'n Whiskers challenge!  Thanks so much for stopping by today and have a wonderful Friday!

Challenges:
Aud Sentiments - Girl Power (unlimited, 3/26/13)
Through the Craftroom Door - Anything goes (x2, 3/25/13) entry #2
One Crazy Stamper - Anything goes (x5, 3/29/13) entry #2

Details:
Size:  6 x 6
Paper:  Basic cardstock, Xpress It, Basic Grey Shine On paper pad, DCWV Royal Garden stack
Image:  Furry Friends from Wags n' Whiskers
Ink:  Victorian Velvet distress ink
Dies:  Spellbinders Labels 1, Grand Wonderful Wings and Matting Basics set A
Cheery Lynn Dies:  Grass border, Miniature and Large Rose Strips, Olive Branches

Copics:  0, BV00/01/02, BG000/10/11/13, C1/3, E000/11/35/39/40/43, R20/22/24/29/83/85, Y21/26/28, YG05/07/09, 

Monday, March 18, 2013

Fun with textures and patterns

Hi everyone!

I'm here to help give a shout about a new challenge running over at Creative Card Crew.  The challenge theme this fortnight is 'masculine'.  We would love to see your card for a male of any age!  For this challenge we are being sponsored by the wonderful Scrapping Center who is offering one lucky random winner a gift certificate to go shopping at their store - what fun!

For my DT card, I decided it was high time to get a card ready for my hubby's cousin and his wife who are due very soon with twin boys.  How cool!  She is going to be one busy momma though as she also has an almost two year old who is just as much a trouble maker as our two year old little imp (who just had stitches removed from her forehead today, after a fall off the craft table chair).

Babies love texture and patterns, which was my inspiration for this card.  Also Jennie is not the cute and frilly type, so I was trying to avoid going that route again.
 

I had a little blooper with the first brad on the bottom, which I actually did last.  The baby who I was holding kicked my arm as I was piercing the hole.  I didn't notice until after it was put on the card base.  Hopefully it's not too noticeable!  I dry embossed the background with my MS score board again, just doing straight lines this time instead of the lattice I used previously and swiped my Tea Dye distress ink pad over it so it could be seen better.  It reminds me a bit of a worn fence this time.  I used my Sew Easy for the first time on the green polka dot panel.  Love it!  I also tried a new technique with the background of the image.  Just randomly dotted with different shades of my yellow Copics.  Easy to do, and I like the textured effect it has.


The image is called Twin Boys from Pink Gem Designs.  The sentiment is continued on the inside, and was something that Google found for me (I completely forgot to mark the location) that I printed off my computer.  The ribbon is from Really Reasonable Ribbon, and I think my last sample from them.  Will have to order some more soon!  The samples they send with your order are fab.


I made the inside layout to match the outside, minus the ribbon and stitching.  The congrats sentiment and the two sets of baby feet were stamped in distress inks.  I swiped the edges of the sentiment panels through the distress inks as well.

Hope I've offered some inspiration for your male card!  I can't wait to see your masculine creations this fortnight.  Have a great Tuesday!

Challenges:
Love to Scrap challenge #2 - Emboss it!  (x2, 3/31/13) entry #1
Sentimental Sundays - Anything goes (x3, 3/24/13) entry #1
Creative Creations - Letter 'B': blue, boys (x3, 3/31/13) entry #1
Cute Card Thursday - Anything goes (unlimited, 3/20/13)
Gingerloft - The color green (unlimited,  3/24/13)
Bearly Mine - Anything goes (x2, 3/25/13) entry #1
Crafty Ribbons - One for the boys (unlimited, 3/27/13)
Sandy's Crafty Creations - Shades of green (unlimited, 3/31/13)


Details:
Size:  5 x 7
Paper:  DCWV, basic cardstock, Xpress It
Image:  Twin Boys from Pink Gem Designs
Stamps:  Congratulations and baby's feet from Stampabilities
Ink:  Black Soot, Broken China, Tea Dye and Peeled Paint distress ink; Copics 
Dies:  Spellbinders Grand Grand Ovals and Large Circles Nestabilities
Cheery Lynn Dies:  *gasp*!!!  I just realized I made a card without my CL dies.  The horror!

Sunday, March 17, 2013

Easter, Easter, Easter =]

Top o' the day to everyone!  A very happy St. Patrick's Day to you all!!

I was bad and have not made any St. Patty's Day cards.  Boo, I know.  But I'm here to share my first Easter card!  Yay!  But first a huge Hello, welcome and thank you to my newest followers!

All dies except the backer panels are from Cheery Lynn.


The card base was cut from Spellbinders Grand Labels 23 and the image panel from Grand Ovals.  I used some gold foil paper from DCWV's Royal Garden stack to cut out the lace eggs and butterflies so they are nice and shiny.  It really looks very lovely in person.


Close up of the flower and egg arrangement.  The flower was made from the Daisy Strip which I just absolutely love (as I do all Cheery Lynn's flowers!) and am wondering why it took me so long to get it.  The layers were cut from white cardstock and colored with Copics.  The leaves are from the Olive Branches die and the eggs are Lace Egg #5 with a trimmed up Oval Stackers die behind them.


The image is Murray from Saturated Canary, colored with Copics.  I tried highlighting around her which is a first for me.  I'm not quite sure yet whether I like it or not?  Maybe I would like it better with a different color.  I also tried a new technique with the grass, after watching this grass tutorial by Alyce from Kit and Clowder.  She has a lot of video tutorials that I plan on watching as soon as I can.  Lovely, lovely coloring she does.


 This Spring Basket 1 is absolutely adorable with the cut out bunny.  I've paired it with Lace Egg #7 and a bird's nest with eggs from Prima.


All the butterflies are from the Mini Dimensional Butterflies set.  You get seven in the set, including a wing for each of them.  How cool is that!  If you look around, you will see all seven of them were used on this card.


And a close up of the rest of the embellies.  Here is the bird cage I've been wanting forever and finally picked up- there's just so many dies from Cheery Lynn that I want (my hubby says they are like Pokemon- gotta collect them all LOL!).  The feather is from Jordan's stash of goodies that I raid every now and then, three pearl sprays from my stash that I colored with Copics, some cheese cloth and a stamped image of a chandelier just because I had a new stamp and wanted to use it somewhere (guess that's me being eclectic again, ha!).

I hope you've enjoyed my card. Thank you so very much for stopping by- it is truly appreciated!

Have a great week!

Challenges:
Cheery Lynn - Easter
Stamp and Create - Fur or feathers (x1 per week, 3/31/13)
The Paper Shelter - Easter (x3, 3/19/13)
Bearly Mine - Easter (x2, 3/18/13)
Stampavie - Easter (3/26/13)
Sincerely Yours Creations - Easter (x3, 3/26/13) entry #1


Details:
Paper:  DCWV Royal Garden stack, basic cardstock, Xpress It
Image:  Murray from Saturated Canary
Stamps:  Chandelier and Happy Easter stamp (on the inside) from Stampabilities
Ink:  Broken China distress ink, Copics
Dies:  Spellbinders Grand Labels 23, Grand Ovals and A2 Matting Basics set A (on inside)

Saturday, March 16, 2013

Jordan's First Easter card

Hi all,

Jordan, my 9 year old daughter, just loves making cards with me and has become quite skillful at them; doing everything by herself.  She's been wanting to make some Easter cards, but we didn't really have anything for that holiday since we just recently started card making not too long ago.  This week, we have slowly been shopping around for such items.  She picked out some papers, as well as images and some Cheery Lynn dies along with a few other items.  She asked if she could enter some challenges, which I agreed to.  So she has taken pictures of her card, I helped her edit them for the blog and made her her own watermark.  She was too shy to make her own blog post, so I got stuck doing that LOL


The first image she picked out is from The Paper Shelter, called The Most Adorable Easter Bunny, and boy is she a cutie!  Jordan colored her with Copics, cut her out and added an egg patterned background panel.  She added Cheery Lynn lace eggs #5 and #7 that she die cut, and added Flower Soft to her tail. 


Thanks so much for reading and letting me entertain my middle one :)  We hope you have a wonderful weekend!

Challenges:
Cheery Lynn - Easter
Simply Create Too - Easter or bunnies
Size:  6 x 6
Papers:  Basic cardstock, The Paper Studio, Xpress It
Dies:  Cheery Lynn lace eggs #5 and #7
Ink:  Black soot distress ink, Copics
Stamps:  Stampabilities, The Most Adorable Easter Bunny
Misc.:  Flower Soft

Friday, March 15, 2013

New Stampin' for the Weekend Challenge!

Hello everyone!

I'm here with my first DT post for Stampin' for the Weekend Challenge!  How awesome is that!  This fortnight's challenge theme is Child's Play (use an image of a child or make a card for a child) and the sponsor is Live and Love Crafts, which is an absolutely fabulous store full of vintage and shabby chic goodies!  I've got my eye on a few things to order very, very soon.  They have some really cool stuff, check them out if you haven't already.

For my card, I used Sweet Blossom from WeeStamps.  Is she just adorable or what?!?

This card is a thank you card for my husband's grandmother, thanking her for the birthday gift for our two year old daughter.  I am unsure how much she cares for flowery, girly stuff (probably not much), so I tried really hard to tone it down.  Boy, that's hard when you just received a bushel full of new goodies!


I have finally been able to find cheesecloth!  I have been loving seeing it on so many cards and have been wanting to try it.  It was white, but didn't seem to show up very well so I sponged it (as always LOL) with Broken China distress ink.  The flowers are from the Large Rose strip from Cheery Lynn.  I only used three layers on each and didn't fluff them as I have to mail it... and the whole frilly, girly issue as well.  I thought they were rather whimsical to match the image.  I used two of my new pearl sprays and the cutest little heart stick pin that I found a set of at Target on clearance.  The pearls in front of it came off of the sprays, I think it's supposed to be a bow?


I swiped the image panel along the Broken China distress ink pad also, to coordinate a bit better with the cheesecloth.

That's it for me.  I hope you will join us in the challenge this fortnight!  Have a wonderful day!!

Challenges:
Celebrate the Occasion - Spring is in the air (x1, 3/18/13)
Crafting for all Seasons - Spring into spring (x3, 3/18/13) entry #1
Crafty Sentiments Design - Hello spring (x3, 3/18/13 entry #1
Daisy Doodles - Spring time (x2, 3/18/13) entry #1
Ladybug Crafts Ink TLT - Spring (x1, 3/25/13)
Cute Card Thursday - Anything goes (unlimited, 3/20/13)
Paper Playtime - Anything goes (unlimited, 3/17/13)
Artistic Inspirations - Flowers (unlimited, 3/17/13)


Product details:
Size:  5 x 7
Papers:  DCWV (little girl's nursery [or something or other] cardstock stack)
Dies:  Spellbinders Grand Ovals, Cheery Lynn Large Rose strip
Embellies:  Pastel brads from stash, pearl spray and bow from His & Hers
Ink:  Broken China distress ink
Stamp:  Sweet Blossom from WeeStamps
Copics:  E000/0035/43, G14, R22/27/85, YR02/04, BV02, Y17, RV000/02/10, V15, Y26/28 and I lost track of the others- sorry!

Sunday, March 10, 2013

Sweetest grumpy ever!

Hello lovely readers!

A huge thank you and welcome to all my newest followers!  It always brings a smile when I see new people.  Thank you so very much!  I promise I will get around to everyone's blogs shortly, hopefully tonight, to see what everyone is up to.

Whew, it's been a busy week, but I have been loving every minute of it.  I decided to take a break from my DT cards so I am not neglecting my blog waiting for the posts to go live.  I made this card for my mom, who is to have surgery in about a week.  Hopefully this will put a smile on her face.

I am ecstatic with the way it turned out.  I'm laughing at myself a bit though, as I have been wondering what my 'style' is.  I think I have finally answered the question to myself with this card:  my 'style' is eclectic.  I like a little bit of everything just thrown on in!

I will include little snippets of details below each picture.  All but two of the dies are from Cheery Lynn. 

As you can see, there really is no theme outside of color.  I just love the image, A Little Bit Grumpy from The Paper Shelter.  I've had her for a short while, but have been waiting not-so-patiently to use her while I put in some practice time using my Copics.  I used Nautical Wheeler Doily and French Pastry Tiny Doily dies in the background.  The tiny butterfly in the corner is from the Mini Dimensional Butterflies set


The panel was really cool to make, I found it somewhere on Pinterest.  Using my MS scoreboard and envelope attachment, I scored the lattice background, cut it out with Spellbinders Grand Label 23 then lightly sponged it with Tea Dye distress ink so the pattern could be seen better. 


I am still enamored with these flower dies from Cheery Lynn as they are so versatile and can be mixed and matched.  All the flowers were made from Build a Flower #2, Cherry Blossom and Embellishments #2.  The flourish shown here is Mini Fanciful Flourish.

The corner embellies are from the Lace corner Deco E set, the border you see peeking out is the Anastasia Border and the fence is the Victorian Picket Fence which was sponged in Tea Dye and Broken China distress inks, then covered with distress crackle paint.  These flourishes are Macarena Corners from Memory Box.  The ribbon is from Really Reasonable Ribbon.

And a side view just because :)


And lastly, here is one of the inside that was decorated with panels that match the papers I used on the front.


I printed out the sentiment in purple ink on my computer.  The two purple background panels on both sides are actually the same color, not sure why they appear two different colors.

Product details below.  Thanks so much for stopping by and I hope you enjoy the rest of your weekend!

Challenges:
Cheery Lynn - Use a doily (3/10/13)
The Paper Shelter - Dies/Punches (x3) entry #1
Papertake Weekly Challenge - Anything goes (unlimited, 3/12/13)
Crafty Ribbon Challenge #40 - Anything goes with ribbon (3/13/13)
Through the Craftroom Door - Anything goes (x2, 3/12/13) entry #1
PanPastel - Make it girly (x1, 3/16/13)
Sentimental Sundays - 3 embellies that start with B (butterfly, bow, bling, baby's breath) 3/17/13
Craftin' Dessert Divas - Linky party!  Anything goes (unlimited, 3/17/13) 
Paper Playtime - Anything goes (unlimited, 3/17/13)
Victorine Stamps - Anything goes
Spark Your Creativity Now - Anything goes (unlimited, 3/31/13)
Challenges 4 Everybody - Anything goes (x3, 3/15/13)
Love to Scrap! - Anything goes (x2, 3/17/13) entry #1
Cutie Pie Challenge - Magical (x3, 3/16/13)
613 Avenue Create - Anything goes (unlimited, 3/16/13)
Cuttin' and Stampin' - Use flowers (3/11/13) 
Delicious Doodles - Use die cuts (x1, 3/14/13)


Details:
Size:  8 x 8" (my cards are getting bigger lol!)
My Mind's Eye:  Lost and Found- Portabello Road "buddies" and "family", Union Square "perfect"
Stamp:  A Little Bit Grumpy from The Paper Shelter
Ink:  Tea Dye and Broken China distress inks
Copics:  0, B02, BG000/01/10/11/13, V01/12/15, E29/35/39, E000/00/11, R20
Embellishments:  Shimmer Satin Pastel Green, rhinestones from stash, Say it in Crystals swirls
Misc. Dies:  Spellbinders Grand Labels 23, Memory Box Macarena Corner
Cheery Lynn Dies:  Nautical Wheeler Doily, French Pastry Tiny Doily, Mini Dimensional Butterflies, Build a Flower #2, Cherry Blossom, Embellishments #2, Mini Fanciful FlourishLace corner Deco E, Anastasia Border, Victorian Picket Fence

Monday, March 4, 2013

First DT post!

Hello everyone and a happy, happy day to you!

I am thrilled to finally be able to share with you the card I made for my first challenge as DT with Creative Card Crew!  This fortnight we are being sponsored by the wonderful and very talented Teri over at Delicious Doodles the winner will receive four of her gorgeous digis.  If you haven't seen her work yet, definitely check her site out!

Introducing Fairy Fae and my first center step card:


Isn't she gorgeous?  I must admit, I was a bit intimidated by her beauty at first.  I quickly found that she was very easy and fun to work with.  My two year old, who loves dots, chose the paper which inspired me to color her wings to match.  On a scrap image to test it out first, I colored them in light purple and dotted with a darker shade of purple.  The blue paper is basic cream colored card stock sponged in Broken China distress ink.

I just love the way her wings turned out so sparkly!  After they were dotted, I painted on icicle Stickles avoiding the veining.  In an attempt to give the individual sections a veined look as well (like dragonfly wings), I pulled out the clear crackle distress paint and painted some on, again avoiding the veining.  Viola!  Not only did that do the trick, it seems to catch the glitter from the Stickles along with the darker  purple dots and enhance them.  Such a lovely effect.  I usually cannot seem to replicate my originals, so I cut out her wings and paper pieced them on to this image.  You may be able to tell in this picture that I also paper pieced the butterflies to give added dimension.


Here is a side view where you can see the paper pieced butterflies better.

Hop on over to Creative Card Crew and join in the fun!  This week's challenge is easy- just use ribbon.  See, easy!  :-) While you're there, check out the amazing job the rest of the DT did.  Absolute gorgeousness!  I am so envious of their talent.

Product details below for anyone who's interested.  Thanks so much for stopping by today!  I hope you have a fabulous week!

Challenges:
Paper Playtime - Anything goes (unlimited, 3/18/13)
Love to Create - Use 2; used ribbon and die cuts (x3, 3/10/13) entry #1
Gingerloft - ribbons and bows (unlimited, 3/9/13)
Craftin' Dessert Divas - Linky Party!  Anything goes (unlimited, 3/17/13)
Spark Your Creativity Now - Anything goes (unlimited, 3/31/13)
Challenges 4 Everybody - Anything goes (x3, 3/15/13) entry #2
Love to Scrap! - Anything goes (x2, 3/17/13) entry #2


Products/details:
Style:  Center step
Papers:  Basic cardstock, K and Co.
Stamp:  Fairy Fae from Delicious Doodles
Ink:  Broken China distress inks
Copics: 0, E000/00/11, Y15/26/28, R20/22/27, B02, YG09, RV13, V12/15
Embellishments:  ribbon from Really Reasonable Ribbon
Misc. Dies:  Spellbinders Grand Labels 23
Cheery Lynn Dies:  Embellishments #2, Mini Fanciful Flourish, Mini Dimensional Butterflies, Build a Flower #2, Anastasia Border


Friday, March 1, 2013

luv ya... more than chocolate

Hey, hi, howdy!

I am back, early... as I figured I would be.  Can't stay away from the cards for too long lol.  I'm just here to quickly share more exciting news!  I made another DT- yay!  So I'll be merrily trudging around blogs who submit to the Stampin' For the Weekend challenges.  Of course I also have a card to share.  This is my hubby's belated V-day card.  It was greatly inspired by Holly's "I love you more than chocolate card" which can be found on her blog here.  While you're there, take a look around- she has so many fabulous cards for your viewing pleasure and lots of inspiration! 

I love, love, love all my digi stamps, but I am particularly fond of the Divas from Meljen's designs.  I used two for this card and had a lot of fun making it, although it was a bit of trial and error trying to figure out how to use the largest Grand die for the base since it doesn't fit on a folded piece of cardstock. 


I used basic cardstock as the base, and the patterned papers are My Mind's Eye Lost and Found.  The glittered pennant flag was fussy cut from the paper and added to the card.  The diva was colored with Copics, added some gold Stickles to the swirls and Liquid Pearls to the dots.  Some are a bit funky shaped because I threw a piece of paper over the card to cover it up when hubby walked in unexpectedly. 


Another easel card :)  And another Diva eating my most favorite food- chocolate!


And open up the box...


Hehe.  I originally had Ghirardelli dark chocolate with caramel squares to put in it, but they were too tempting and I eated them while I was making the card.  Shhh, it's a secret!  He likes Reese's better anyway, so that makes it ok right?

Thanks so much for stopping by!  Hope everyone has a great weekend!

Spark Your Creativity Now - Anything goes (unlimited, 3/31/13)
The Pink Elephant - Anything goes (unlimited, 3/3/13)
Simon Says Stamp - Anything goes (unlimited, 3/6/13) 
Simon Says Stamp - Stamp you love, but don't use (unlimited, 3/4/13) brand new stamps
Craft us Crazy - Anything goes (x3, 3/13/13) entry #1
One Stitch at a Time - Use a digi 
CMC Copic Challenge - Anything goes (x3, 3/15/13) entry #1
Jelly Park Challenges - Shapes (x2, 3/7/13) entry #2
Through the Craftroom Door - Anything goes (x2, 3/5/13) entry #1 
Bearly Mine - Anything goes (x2, 3/4/13) entry #1 
Party Time  Tuesdays - Anything goes (x2, 3/4/13) entry #1
Love to Create - Wrap it up 
Crafts and Me - #122 Dies or punches (unlimited, 3/5/13)
ABC Challenge - Anything love (x1, 3/13/13)
One Crazy Stamper - Anything goes (x5, 3/29/13) entry #1 
The Crafting Cafe - Favorite color (x1, 3/31/13) 
Penny's Paper-Crafty - Favorite color (x3, 3/5/13) entry #1

Products/details:
Papers:  Basic cardstock, My Mind's Eye Lost and Found
Stamps:  Flirty Diva and Chocolate Diva from Meljen's Designs and Stampendous Love Messages
Dies:  Spellbinders Grand Labels 23 and Matting Basics A
Ink:  Barn Door distress ink
Copics:  E000/00/11/29/39, R20/22/27/29, BV00/02, Y21/26/28